Secure Your SHM: Set Up a Self-Custodial Wallet on Shardeum
With a self-custodial wallet, your SHM stays fully in your control. This blog explores why that matters in decentralized networks like...
With a self-custodial wallet, your SHM stays fully in your control. This blog explores why that matters in decentralized networks like...
Your first step into Shardeum begins with setting up a self-custodial wallet (also known as a non-custodial wallet). This isn’t just about installing a wallet app — it’s about creating a self-sovereign identity that gives you full control over your funds and data on the Shardeum blockchain and across the wider Web3 ecosystem.
Take control of your digital and financial future — on your terms.
Disclaimer: The token amounts shown in screenshots were captured before the SHM token split. Shardeum has since undergone a 240× redenomination, so current prices and balances shown on exchanges or aggregators (like CoinMarketCap) will appear proportionally smaller.
To make sense of how self-custodial wallets work, it helps to compare them to something more familiar — like digital payment apps such as Apple Pay or Google Pay.
A Shardeum account is your identity on Shardeum blockchain. It’s made up of two cryptographic keys — a public key (used to create and share your “wallet address”) and a private key (used to access and control your account).
Your wallet securely stores your private key, while your actual account data — like your SHM balance and transaction history — is stored on the blockchain network.
When you use your wallet to sign a transaction, it uses your private key to prove that it’s really you — without ever revealing the key itself.
Getting started with Shardeum is simple — it only takes two main steps to set up your wallet and connect to the network:
For this tutorial, we’ll use MetaMask — a popular, user-friendly Web3 wallet available as a browser extension (we’ll be using Chrome) and as a mobile app. The process is more or less the same if you want to use another wallet provider. Just make sure they are EVM-compatible, which we will talk about in a bit.
Go to https://metamask.io on your browser and click on “Get MetaMask”

Add it to your Chrome browser by clicking “Add to Chrome” and approving permissions.

Once installed, you can now access MetaMask by clicking the puzzle-shaped Extensions icon in your browser toolbar and selecting the MetaMask icon.

Open MetaMask from your browser’s extension menu and click on “Create a new wallet”.

Agree to the terms, then create a strong password (minimum 8 characters). This password is used only to login to MetaMask wallet locally on your device. Note, you cannot recover the MetaMask login password itself — but you can reset it using your Secret Recovery Phrase (SRP), which we will cover right below. Aftering creating your MetaMask password, click on “Create a new wallet” again.


On the next screen, you’ll be prompted to secure your wallet using a Secret Recovery Phrase (SRP) — a unique 12-word phrase. Choose “Secure my wallet (recommended)” to proceed and follow the instructions. This phrase is the only way to recover your wallet due to accidental app deletion, crashes or local password recovery, so make sure to store it safely and offline.


After clicking Next, you’ll be asked to confirm your SRP by selecting the words in the exact order they were shown. Once confirmed, MetaMask will display a message indicating that your wallet is ready to use. It will also remind you where to find your recovery phrase later, in case you need to back it up again in the future.


You can click “Done”. The next screen will confirm that MetaMask has been successfully installed and guide you on how to pin the MetaMask extension to your browser toolbar for easy access.

You’ll now land on the MetaMask home screen — the same screen you’d see if you opened MetaMask from your browser’s extension toolbar or your mobile app. Your first wallet account will be typically labeled “Account 1,” with a default balance of 0 ETH. Below that, you may see 0 USD, which simply reflects the current value of your ETH (or other EVM based tokens) in USD. You can customize this display or switch currencies anytime in the settings later.

0x Wallet Address → A string of characters starting with 0x3bD..52.This is your public-facing address. You can copy it by clicking on it — use this to receive SHM tokens and connect to available applications.| Element | What It Does | Visibility |
|---|---|---|
| Public Key | Generates your wallet address; used to verify transactions | Hidden |
| Wallet Address | Derived from your public key; share this to send and receive tokens | Visible |
| Private Key | Used to sign transactions; proves you are the owner | Hidden, exportable |
| Recovery Phrase (Seed Phrase) | A master key that can regenerate all accounts in your wallet | Shown once during setup |
MetaMask is an Ethereum Virtual Machine (EVM) compatible wallet, which means it’s connected to the Ethereum Mainnet by default. However, it’s important to note that Ethereum and Shardeum are two entirely separate Layer 1 blockchains.
As highlighted in Shardeum’s whitepaper, our strategy is to innovate at the core — scalability and decentralization — while deliberately retaining familiar elements like wallet compatibility, the EVM, and blockchain explorers. This ensures a seamless experience and faster adoption for both users and developers.
Now let’s add the Shardeum network. Click the network dropdown at the top of MetaMask and select “Add a custom network”.

Next, input the Shardeum RPC endpoint, which serves as a technical bridge (or API) allowing your wallet to interact with the Shardeum network. Connect to Shardeum Mainnet using the details as shown in the screenshots below and hit Save (Alternatively, you can click the blue ‘Connect to Shardeum Mainnet’ button in our docs page to skip manual entry).


Once you’ve added the network, clicking the network dropdown will now display Ethereum Mainnet, and Shardeum Mainnet. Select “Shardeum Mainnet”, and your wallet interface will switch — allowing you to see the difference immediately.

When you switch from Ethereum to Shardeum in your MetaMask wallet, you’ll notice something interesting:
🔄 What Changes:
✅ What Stays the Same:
Shardeum Wallet Address:

1. This is the address you’ll use to send and receive SHM, sign transactions, check your balance, and connect to other applications on the network.

2. Whether you're using Shardeum Testnet or Mainnet, your wallet address stays the same. Just switch networks to view the corresponding balance and transactions.
Click the button below for a quick, step-by-step tutorial on how to buy SHM and withdraw it to your self-custodial wallet like MetaMask. Funding your wallet enables you to take full control of your SHM—whether it’s sending ultra-low-cost P2P transactions, making instant global remittances, handling seamless cross-border payments, or staking SHM to run a node and earn rewards.
If your EVM-compatible wallet like MetaMask was removed accidentally, stopped working due to app crashes, you’re setting it up on a new device, or you’ve lost access to your local password, you can recover full access to your wallet and SHM tokens by importing your existing account using your Secret Recovery Phrase (SRP). This is another reason why you cannot afford to lose your SRP.
If you’ve lost access to your SRP, your only fallback is to recover individual accounts using their private keys. Keep in mind: each private key restores only one account, not the entire wallet. To recover multiple accounts, you’ll need to repeat the import process separately for each one using its unique private key.
Important: While private keys can technically be used for recovery, they are not a secure or recommended way to back up your wallet. In fact, it’s best to avoid saving private keys altogether unless absolutely necessary.
This method restores your entire wallet, including:
Follow These Simple Steps:
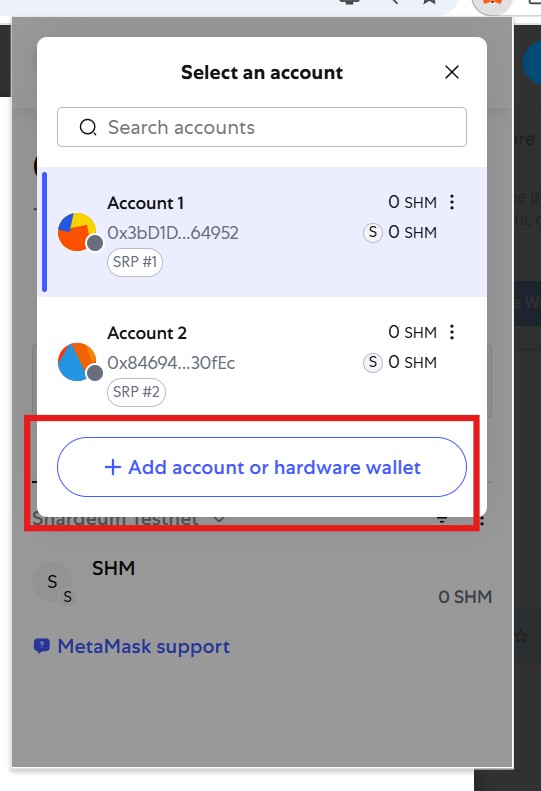


You’ll notice the restored account appears as Account 2 (or similar), labeled with SRP #2 — indicating it was imported using a second Secret Recovery Phrase. This can be useful to easily track and manage multiple wallets and their corresponding SRPs if needed.
This is useful if you’ve saved the private key for a specific account.
You will follow the same process outlined above. Just that instead of choosing SRP as shown in the second screenshot, you will select Private Key option. You can paste the appropriate private key and import your wallet account(s).
The aforementioned processes are nearly identical if you are importing wallet accounts on your mobile device.
L1 blockchain networks like Shardeum majorly runs two types of networks: Testnet and Mainnet.
The Testnet is a safe, sandbox environment — often rolled out in multiple stages or phases — where users and developers can explore features incrementally, test transactions, and build applications using test SHM tokens that hold no real-world value.
The Mainnet, on the other hand, is the live version of the blockchain where real SHM tokens are used and all transactions are permanent.
Shardeum has partnered with leading wallet providers to make it easier for users to connect and transact. The wallets include MetaMask, OKX and Trust Wallet. But you’re not limited—any EVM-compatible wallet is expected to work seamlessly with the Shardeum mainnet.
Installed directly in your web browser (e.g., Chrome, Firefox), these wallets are ideal for interacting with dApps and signing transactions on desktop. Example: MetaMask
Designed for smartphones, mobile wallets let you send, receive, and manage crypto easily on the go. They also support features like QR scanning and in-app browsers for dApps. Examples: MetaMask Mobile, Trust Wallet
Physical devices that store your private keys offline, offering the highest level of protection against online threats and hacks. Ideal for long-term or high-value storage. Examples: Ledger, Trezor
Accessible directly through a browser without installing extensions, web wallets offer convenience but may rely on third-party infrastructure. Example: Rabby
When you create a wallet, you’ll be shown a Secret Recovery Phrase (also called a seed phrase) — typically 12 randomly generated words. This phrase generates your wallet’s private key and is the only way to recover your wallet if you lose access to your device or forget your local password.
Treat it like your master key and never share it with anyone — not even with people claiming to be support staff. We strongly recommend writing it down and storing it in a secure, offline location. If someone gains access to your seed phrase, they can generate your private key, gain full control of your wallet, and transfer all your funds to their own address — and there’s no way to reverse it.
A private key is what actually signs your transactions on the blockchain — it’s the cryptographic proof that you own and control a specific wallet address account. No password, no biometric check, and no MetaMask interface is required. Just the key itself can bypass all local security and grant full control over that account.
For most users, there’s rarely a reason to rely on — or even store — private keys, whether digitally or offline. Your SRP is the safer, recommended way to back up and restore your entire wallet, including all accounts associated with it.
On centralized exchanges (CEXs), your wallet is tied to a username and password — not to your own cryptographic keys. If you lose access, recovery is typically possible through familiar methods like KYC verification or reaching out to customer support. In some cases, they may even help reverse mistaken transactions. SHM can certainly be stored on CEXs or with other custodial services if you prefer that convenience — they manage access on your behalf. However, while this setup may seem safe, it comes with trade-offs: your funds can be censored, frozen, or lost entirely if the platform is compromised, shut down, or mis-regulated.
By contrast, decentralized networks like Shardeum are designed to eliminate single points of failure. The core principle is to give you full control of your assets through non-custodial wallets, where ownership is secured by your cryptographic keys — not centralized systems. This means complete autonomy over your funds and transactions. But it also means you are solely responsible for protecting your private key or Secret Recovery Phrase.
Always double-check the network before sending or receiving SHM or any other tokens. Sending funds to or from a non-EVM-compatible network can result in permanent loss of assets, as those networks use different address formats and transaction protocols. Since wallets don’t usually warn you about mismatched networks, it’s important to manually verify that both sender and receiver are using EVM-compatible chains like Shardeum, Ethereum, or other supported networks.
While Shardeum focuses on building a robust and scalable base layer to make decentralization truly affordable and accessible, UX-focused innovations and interoperability in Web3 — along with evolving regulations worldwide — are steadily catching up, bringing a seamless Web3 experience closer to reality.
Join Shardeum’s Proof of Keys Airdrop program by registering and holding SHM in a self-custodial wallet for 30 days, while supporting the core principles of...
Learn how to set up your Shardeum wallet and connect to the mainnet in minutes. Start using SHM on a network built for ultra-low fees and limitless...
Learn how to participate in the Shardeum (SHM) Token Sale before public trading begins with this step-by-step...